This guide will assist users to connect their Kyocera Device to a Local Area Network (LAN).
- 1. Connect the LAN cable to the machine
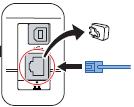
- Connect the power cable to the machine
- Turn the power switch on

Please refer to the Operation Guide of your machine if you’re unsure about the location of your power switch. - Please seek advice from your IT/Network Administrator if DHCP or if a Static IP address is required. Your device will have DHCP & Auto IP enabled by default.
When you connect your LAN cable to your printer, your machine will automatically be assigned to an IP Address. Print a Status Page to find your printer’s IP Address. The next step will define the configuration DHCP and static IP configuration. - a) If your device is to set up using DHCP please follow these steps:
Press System Menu or Menu > Report > Print Report > Status Page
Your IP Address under Network > IPv4 > IP Address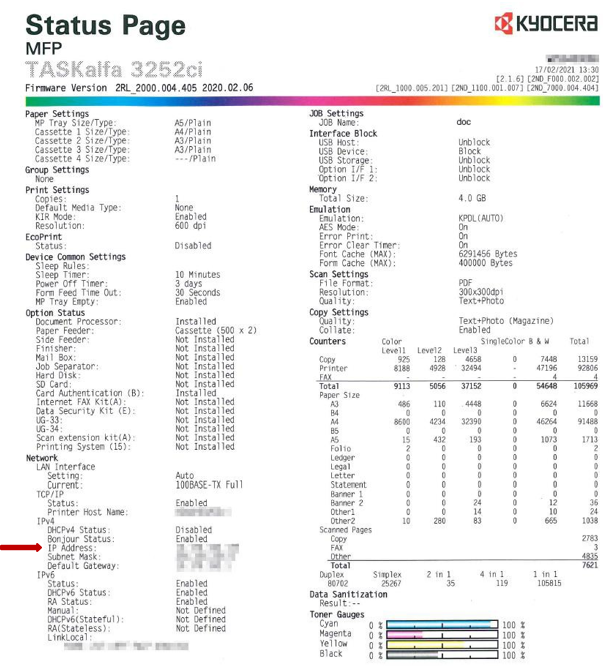
b) If your printer requires to be set up with a static IP address, follow the steps below:
Press System Menu or Menu on the machine > System Network > then navigate to System/Network and enter the login username and password > Network > Wired Network Settings > TCP/IP settings > IPv4 Settings
The DHCP will need to be turned off. Select, or press OK to turn off the DHCP.
The Auto IP will need to be turned off. Select, or press OK to turn off the Auto IP.
Enter the IP Address, Subnet Mask and Default Gateway and press OK to save the settings.
Once you have completed this, restart the machine for the setting to be applied.
Print a Status Page to Confirm the Network settings are applied: Press System Menu or Menu > Report > Print Report > Status Page
Your IP Address will appear under Network > IPv4 > IP Address
If IP settings have been configured, proceed to step 6. Please note you will be prompted to log in with a username and password.
The login Username/Password is based on the page per minute. For ECOSYS printers the last 2 digits of the model number of the machine followed by ‘00’ (e.g) M2040=4000 for login Username/Password. For TASKalfa machines it's the 1st 2 Digits of the model number of the machine followed by ‘00’ (e.g) 3252Ci=3200 - Once you have completed the LAN connection, you will need to install a Printer Driver on your computer. If your Kyocera printer did not come with disc to install a driver or your computer does not have a disc drive, please download the Printer Driver for your computer:
a) Enter your device model name and choose the correct model as it appears in the drop-down list.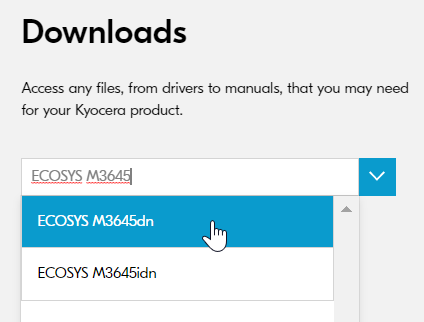
b) The website will determine the operating system you are using, please download the appropriate driver. - For Windows users, the recommended printer driver is the KX Driver

For Mac users, download and install the Mac driver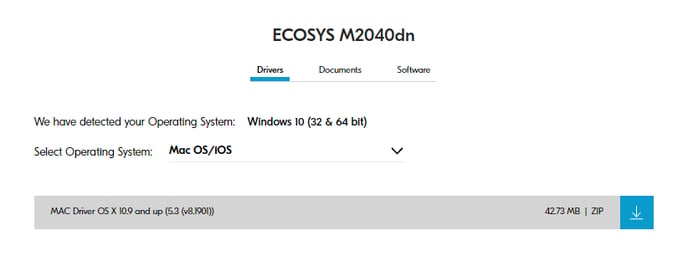
Please refer to the Operation Guide for further information about installing the driver.
Further assistance
If you require further assistance, please feel free to contact us directly via:
- Chat: the chat in the bottom right corner of our website. ↘️
- Phone: to speak to a member of the Kyocera support team, call our helpline on:
- Australia: 135 962 and choose option 3
- New Zealand: 0800 459 623
Phone Support hours are Monday to Friday 9am to 5pm local time across Australia and New Zealand (excl public holidays).
Chat Support hours are 9am to 5pm AEST/AEDT.